Gen II Systems

How the System Works
How the Self-Test Works
Bad Graphs
Diagnostic Tips


How it works:
Gen II is the simplest evap system that Toyota has. It's basically just a charcoal canister with the vent valve built onto it, a purge valve that releases vapor into the intake, and the piping that connects them to each other and the gas tank. It tests by using vacuum (negative pressure) instead of (positive) pressure, so that you don't risk accidentally blowing gasoline out of a leaking pipe or something. The test runs when a timer in the ECM detects that eight hours have passed since the car was shut off.

The system collects fuel vapor in the charcoal canister. Every now and then while the engine is running, the purge valve will open up and allow the intake to suck out some of the fuel vapor from the canister. The vent valve opens to replace the sucked-out vapor with fresh air. That's literally it. Why couldn't they have just left it this way?


How the self-test works

In step 1, the test is just getting started. The pressure should be equal to atmosphere, because the vent valve is open, letting fresh air in. Atmosphere tends to be around
760mm/hg absoluteAbsolute pressure means the literal amount of pressure being applied just by the weight of the earth's atmosphere
, or
0 mm/hg gaugeGauge pressure means the pressure you would read off a guage, which is calibrated to earth's atmospheric pressure. For example, your tire gauge says 0 when it's not in use, even though it's subject to 760mm/hg of absolute pressure.
. This will always vary a bit, because air pressure tends to change by very tiny amounts.

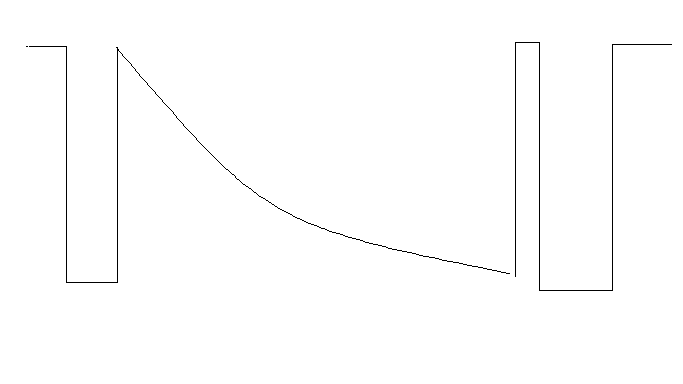
In step 2, the system does a reference check. The vent valve has a hole that's .02" wide in it. It opens this hole and turns on a vacuum pump, causing the pressure in the canister to drop (remember, vacuum is just another word for negative pressure). During the reference check, the system is seeing what the pressure/vacuum reading would be if there were in fact a .02" leak. Remember, 1) a leak would cause a loss of pressure/vacuum and 2) in order for it to pass EPA regulations, there cannot be a leak greater than .02". Typically, the numbers will be about 20mm/hg lower when this reference check runs, so your absolute pressure should be around 740 and your gauge pressure should be about -20, give or take a little.

In step 3, the system closes both valves (purge and vent) and applies vacuum to the canister and fuel tank together, reading the pressure. If the system is good, the vacuum pump should be able to draw a deeper vacuum than it did during the reference check. In other words, if the vacuum in step 3 goes below the level set during the reference check (e.g. the reference vacuum is -20mm and the test vacuum is -25mm), the system is good.
The graph here resembles what a good evap check should look like.

In step 4, it releases the vacuum and pulls down another reference check just to confirm it hasn't changed. It releases the vacuum to prove that none of the valves are sticking shut, then does the second reference check to confirm that nothing went wrong with the reference hole. On the final graph, you should be able to draw a line connecting the two reference checks straight across, and the vacuum level achieved during the test should be below that line.

In step 5, it releases the vacuum one more time, and the test is done.


Other common (but bad) graphs:
The graph to the left shows a gross leak (aka a large leak). You see that it completed both reference checks but was unable to pull down any vacuum during the test portion. This indicates something is wide open.

1. Check the gas cap
2. Make sure all the hoses are connected
3. Look for animal damage to the hoses, especially the corrugated ones that connect the charcoal canister to the gas tank (these may be easiest to find with the smoke machine)
4. Check for a cracked canister (also, easiest with the smoke machine)

The graph to the left shows a small leak. Notice how during the testing phase, it can't quite make it down to the levels set by the reference check. These are the worst, because now you're looking for a leak that is probably .03" wide. You'll probably want to get the smoke machine out, and in my experience, it's usually going to be an animal taking a little nibble out of a hose of some kind in a very awkward area or if you're lucky, a worn out gas cap o-ring.


Diagnostic tips
- When I was checking these, I'd usually try and let it pull down like 5mm lower than the reference, so it would be really obvious that the test passed.

- The automatic test takes forever. If you know what you're looking for, you can save a ton of time clicking through the manual test: reference check for a couple seconds to see what the number is, pressure check until you're about 5mm below the reference, then final reference check for another couple seconds. Done.

- Getting pretty much every canister code at once (stuff like having it fail too high and too low at the same time) typically means a problem with the pump, and the problem is usually that an animal chewed up the wires going to it.

- The test will run faster if the tank is full, since there is less air that the vacuum needs to pump out.

- Evap systems with an electrical problem won't let you get into the graph page to do that test. If you can't even start the test, often you have a wiring issue (although I've seen it one time with the battery so low that it didn't have enough voltage to start the test overnight; the customer had to jump the car in the morning and it had just enough voltage to run the keep-alive memory and save the evap code).

- A leaking gas cap seal was very common. If you have a small leak, run the test to confirm it. The test vacuum won't quite make it down to the reference vacuum. Grab a gas cap off of another car and test it again. If it goes down below the reference vacuum this time, you know the cap was bad. Note also that sometimes it will show a small leak, but will pass the test. Often times, this is because of components shrinking/contracting overnight. It will fail the test overnight, but things will expand just-enough to re-seal the cap and fuel filler during the day. If it shows a small leak but passes the test with a cap that has never been replaced, odds are that the cap seal is bad (and since it's a pain to get a new o-ring for the cap, just write it up for a new cap).

- The purge valve is working if you hear a very rapid clicking or buzzing when it activates (it opens and closes hundreds of times a minute). The vent valve is working if you feel a single click when it activates, since just stays open or closed once activated.


Evap Home
Home page for the whole website